How We Develop Mobile Applications - Pt 2 - iOS
Getting our environment setup for iOS
Welcome back for the second post in our blog series on how we build mobile apps at Collective Idea. In the first part of the series, we covered what our finished app will be. During this next part we will be going over how our environment is setup and how we handle source control, external dependencies, and our Xcode environment.
Source Control
We keep our code under source control. To begin on this project, we will visit GitHub and create a new repository. Then in the terminal, we clone the empty repository as the starting point.
$ git clone https://github.com/collectiveidea/donuts-ios.gitAt Collective Idea, we stick pretty closely to the Github workflow. Every time we make changes to our project, we submit a pull request for others on our team to review before merging it back into our master branch.
Don’t ignore the .gitignore file
It’s important to start a project with a good .gitignore file. This is especially true of an Xcode project. There are lots of files you will want for yourself and not the rest of the team.
Here’s an example of a standard Xcode .gitignore file [i] uses:
.DS_Store

build/
DerivedData/

*.hmap
*.ipa
*.dSYM.zip
*.dSYM

## Playgrounds
timeline.xctimeline
playground.xcworkspace

# Xcode
build/
*.pbxuser
!default.pbxuser
*.mode1v3
!default.mode1v3
*.mode2v3
!default.mode2v3
*.perspectivev3
!default.perspectivev3
xcuserdata
*.xccheckout
*.moved-aside
DerivedData
*.hmap
*.ipa
*.xcuserstate

Carthage/
External dependencies
Often times during project development, you will come across the need to include an external dependency. As of Swift 3.0, there is a native package manager, BUT it is not yet supported by Xcode. Until it is, we will be making use of Carthage.
You can install Carthage binary through Homebrew:
brew install carthage
You will then need to create a Cartfile with the library dependencies for your app. For our donuts app, we will need to include Alamofire to help us make network calls. To do so, we create our Cartfile like so:
github "Alamofire/Alamofire" ~> 4.0
It is then a matter of letting Carthage pull down our dependencies and build them for us.
carthage update
Creating the Xcode project
Now that we have a repository for our project, we can build the Xcode project. [i] uses Swift 3.0 whenever possible. So we’ll choose that in our project wizard.
Adding The External Libraries
There are two steps necessary for our Carthage-created external libraries to work. The first is to add a reference to the library under the Xcode project.
.gif)
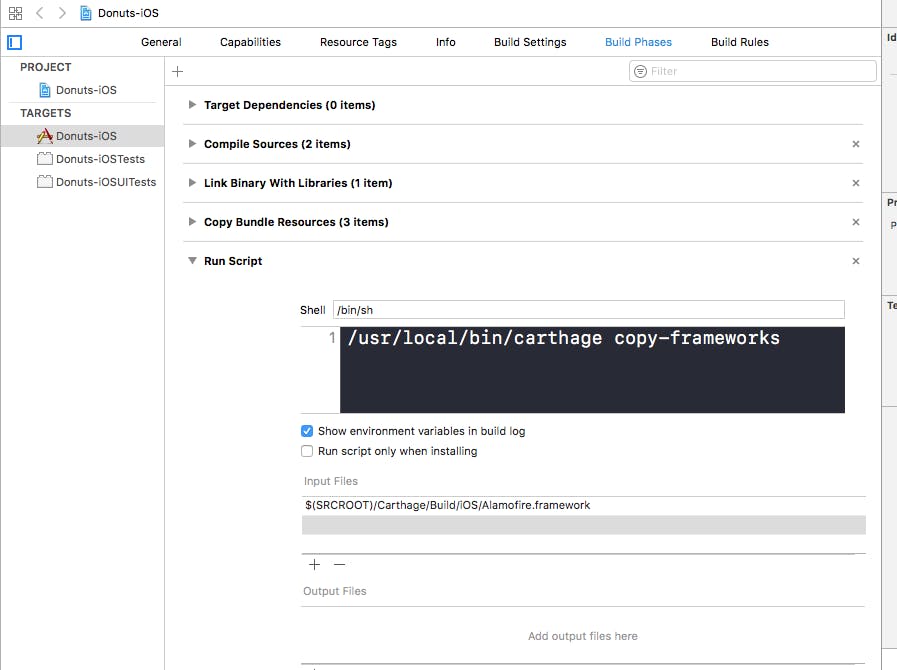
Finally, we need to add a rule to our project build process that will copy the external library to the app. If you forget this step, the project will not work when deploying to real hardware.
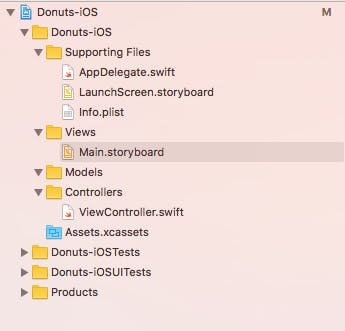
Project layout
It’s always good to keep your file groupings clean so that other developers can easily navigate the project. We like to keep our projects with the following groups:
Coding styleguide
When working in a group, it is a good idea to agree upon a style of writing code. At Collective Idea, we chose to use the Github Swift Styleguide with some minor differences. The important part is that all of us have agreed upon the changes.
Verifying the Setup
At this point it is a good idea to make all our setup is working properly. A quick way to test this is to plug in a iOS device and build and run the app on it. You will be presented with a blank screen but that is ok right now.
In the next part of our blog series, we will be setting up the basic app and talking with the data source. There will also be a Android version of the blog series in conjunction with these posts in the coming days as well.
To view other posts in this blog series broken down by OS, see below:
Both
Part 1 - How We Develop Mobile Applications - Best Practices
Android
Part 2 - Getting Our Environment Set Up for Android
Part 3 - Using TDD to build our models and API client
iOS
About Tim Bugai
Programming since the age of 8, Tim has a strong background in agile software development, Ruby, JavaScript, and iOS. He’s also helping our team with mobile application development, often leading the charge.
Comments
informative post it is really helpful for us