Part 1: ARKit Wall and Plane Detection for iOS 11.3
How to detect vertical and horizontal planes using Apple's ARKit
Corridor of Building by Pixabay is licensed under Creative Commons Zero
With the introduction of iOS 11 came ARKit. Apple’s framework to allow 3D objects to be placed in the “real world” using the iPhone’s camera and motion technology. The initial release provided horizontal plane detection, but now in iOS 11.3, it detects vertical planes as well!
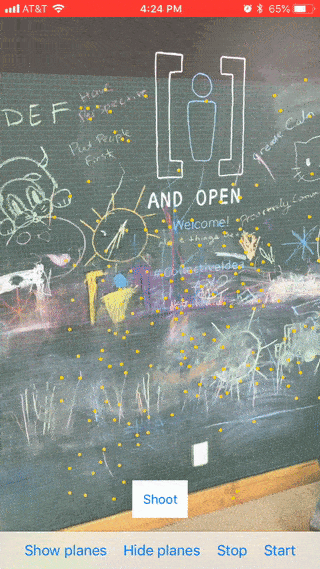
Here’s an example of what we’re going to build.
The good news is, if you’ve already implemented horizontal plane detection, you’re pretty much done.
Just add .vertical to the list of planeDetections and you’re done! Easy peasy.
swift
let configuration = ARWorldTrackingConfiguration()
configuration.planeDetection = [.horizontal, .vertical]
However, if you want to learn how to implement plane detection yourself, keep reading. To see the final working example, check out the project on GitHub.
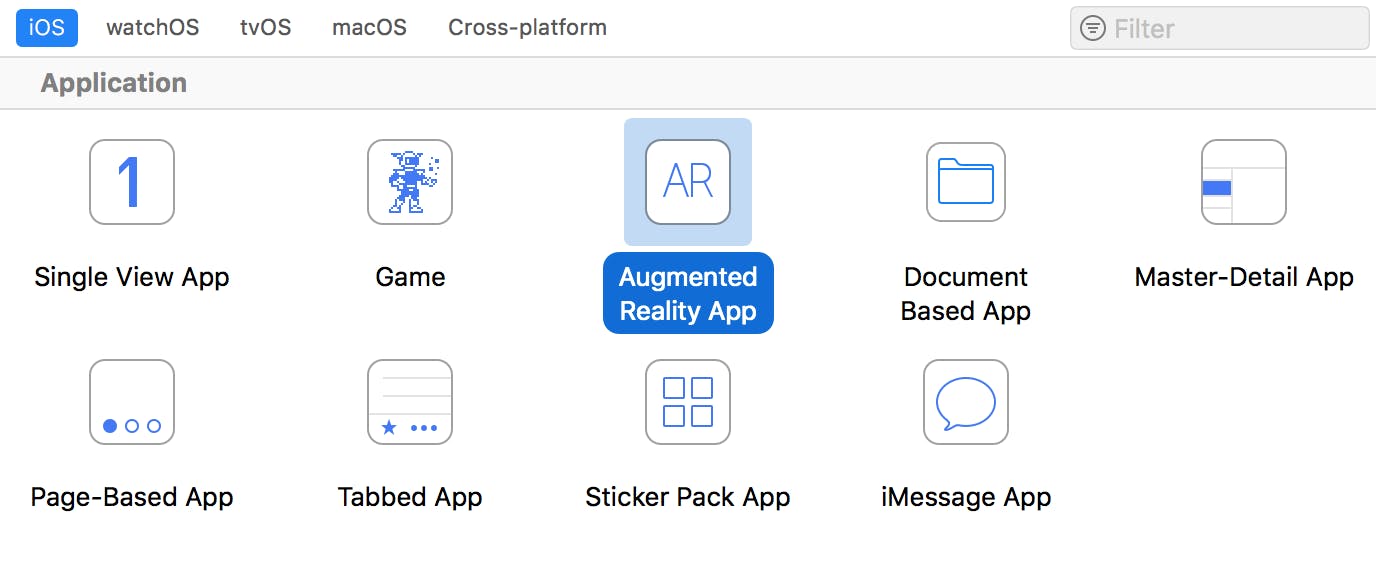
Let’s start by opening Xcode and creating a new Augmented Reality project.
You’ll see a lot of boilerplate code in the ViewController class. Feel free to read through it as there is some good info and important methods stubbed out. However, we’re going to make an ARSceneManager class to handle all that functionality. Let’s clean up the ViewController class so all that is left is this…
swift
class ViewController: UIViewController {

    @IBOutlet var sceneView: ARSCNView!

    let sceneManager = ARSceneManager()

    override func viewDidLoad() {
        super.viewDidLoad()

        sceneManager.attach(to: sceneView)

        sceneManager.displayDegubInfo()
    }

}
You’ll see some errors as we haven’t created the ARSceneManager class yet, so let’s do that.
Create a new Swift file and call it ARSceneManager. In there, define the ARSceneManager class and setup the missing attach(to:) and displayDegubInfo() methods. Since this is going to handle the ARSCNViewDelegate callbacks, it should inherit from NSObject.
Swift
class ARSceneManager: NSObject {
    // 1
    var sceneView: ARSCNView?

    // 2
    func attach(to sceneView: ARSCNView) {
        self.sceneView = sceneView

        self.sceneView!.delegate = self
    }

    // 3
    func displayDegubInfo() {
        sceneView?.showsStatistics = true
        sceneView?.debugOptions = [ARSCNDebugOptions.showFeaturePoints, ARSCNDebugOptions.showWorldOrigin]
    }

}
Let’s walk through that code now.
- Here we store a reference to the ARSCNView
- The
attach(to:)method is used to set the sceneView and its ARSCNViewDelegate displayDegubInfo()is used to show some useful information like frame rate, the worlds origin, and feature points that the camera picks up to base the AR world off of. Not necessary, but cool to see!
Detecting Planes.
In order to detect planes we need to configure the sceneView. Add this method to the ARSceneManager class. The methods are pretty self explanatory.
Swift
private func configureSceneView(_ sceneView: ARSCNView) {
        let configuration = ARWorldTrackingConfiguration()
        configuration.planeDetection = [.horizontal, .vertical]
        configuration.isLightEstimationEnabled = true

        sceneView.session.run(configuration)
    }
And call it at the end of the attach(to:) method.
Swift
func attach(to sceneView: ARSCNView) {
  //...

  configureSceneView(self.sceneView!)
}
Now that plane detection is happening, we need to implement the ARSCNViewDelegate so we can be notified when an AR plane is found!
Let’s add an extension to ARSceneManager to handle the delegate calls.
Swift
extension ARSceneManager: ARSCNViewDelegate {

    func renderer(_ renderer: SCNSceneRenderer, didAdd node: SCNNode, for anchor: ARAnchor) {
        // 1
        guard let planeAnchor = anchor as? ARPlaneAnchor else { return }

        print("Found plane: \(planeAnchor)")
    }

}
This method notifies us when an anchor was found and a node was placed.
- All we are concerned with are planes, so if the anchor is not an
ARPlaneAnchor, we bail. - Then we just print out that we found one!
Run the application on a device (running iOS 11.3), and check your log after panning around a surface. Once ARKit detects a plane you’ll see it printed in the debugger.
Pretty cool, but it sure would be nice to see those planes!
In part 2, we’ll show how to render a grid on an ARPlaneAnchor so you can see the virtual planes.
Here is the final version of Part 1 on github.
About Ben Lambert
Ben is an iOS developer and designer. He has a passion for building rich and intuitive UI /UX experiences for mobile. In his free time, he enjoys creating mobile app games.
Comments
Hey, Thanks for the tutorial, I didn’t realize swift had that so I was feeding flipped photos to another view to try and get vertical detection. Just Wondering, Is there a way to get plane detection from farther away (5-10m)?
Hi, I just tried with your well-explained steps, But unfortunately, I am not able to detect the plain walls or floors. If I am scanning the embossed/textured wall paint then it easily detects it. D you have any idea/update/demo for it? If yes can you please guide me through it.?
Thanks
“Run the application on a device (running iOS 11.3), and check your log after panning around a surface”
Online bullet force game.